Showing posts with label dessert. Show all posts

Wednesday, 27 July 2011

Flourless chocolate cake with lemon creme fraiche


Chocolate chocolate chocolate! I know there's other types of cakes out there but despite my best efforts to cook something else, chocolate beats everything for me, (unless it's coffee-chocolate in which case, I go into a frenzy of caffeine and need to be stopped.)
This cake is rich, grown-up dessert. It's low in sugar, wheat-free and gluten-free, and extremely quick to make requiring only 15 minutes in the oven! And the filling is a very smooth process as well, requiring no icing sugar.
It's a squidgy, moussey, truffley dream with a consistency that means you will leave teeth marks in, which I love. It might need a bit more sugar to make it palatable to everyone, but if you are a fan of dark, bitter cocoa flavours then give it a shot unchanged. The most challenging part of making this is seperating the eggs - so it is a cinch! It also survived going to a picnic in Hampstead Heath without any trouble, as even if it gets a bit squished, it's still just fine. It's even nicer, if I dare say it...
Ready to be baked


Flourless chocolate cake with lemon creme fraiche
  • 8 medium eggs
  • 400g chocolate (the more cocoa the better, 70% is suggested)
  • 150g butter
  • 2 tbsp caster sugar
  • 300ml creme fraiche
  • 1 lemon (zested)
  • Pinch of sea salt
Mine never looks as good as the picture :(
You're going to eventually mix everything in the bowl that you melt the chocolate in, so bear this in mind when mixing and cracking.
Pre-heat your oven to 180C and line the base of your cake tins with greaseproof paper. I have to stress this - greasing is good too, but importantly the lining will save you a disaster with a cake like this. Separate your eggs into two clean bowls, with yolks in one and whites in another, and quickly whisk the yolks with the salt. Meanwhile, put a heatproof bowl over some simmering water and melt the chocolate and the butter together. If you're careful, you can just do this directly in the pan, but I think the double-boiler method is better. Be wary of the chocolate burning - stir often and don't forget about it, then take off the head and leave to cool (or transfer to a cooler mixing bowl if melted directly in the pot.)
While it's cooling down, beat the egg whites with an electric whisk until stiff, then fold in the sugar. You can double or even triple the amount you use to make the cake sweeter, depending on who you're cooking for. Then fold the egg yolks into the chocolate and butter mix, followed by the egg whites. 
And you're done! Divide the mixture into a large cake tin, or two or three smaller ones. The original recipe suggests 2x18cm. I did 3x14cm I think. Put in your oven, and take out after 15 minutes or so, or when cooked through. To make the filling, put the creme fraiche and lemon zest and mix, using it to sandwich the cakes together when cool. Finally, If you feel fancy, cut out a shape in paper and scatter icing sugar over so it leaves a nice picture on top. 
Mmm, HEALTHY

Credit: Leon - Naturally Fast Food (Book 2)

Wednesday, 18 May 2011

Strawberry pavlova with chocolate cream


Strawberries could easily be considered to be heavily overdone in terms of summer puddings, and initially, this pavlova might sound no different to your standard Eton mess fare, or even strawberries and cream. But there's a reason for that - they're utterly delicious and beloved by almost all. And for a make-ahead dessert, what goes more perfectly together than crispy, chewy meringue, leaving-teeth-marks-in-it-so-thick cold chocolate cream, and juicy sweet strawberries? This is also heavenly when leftovers are rescued from the fridge then crammed into a tupperware box then carried by bike to Regent's Park to be eaten with greed by friends sharing forks. Lovely for posh picnics.  Plus I hear it's going to be a bumper year for straws, so you might as well!
This is a wonderful summer dessert for whenever you're entertaining, again - I've fed my whole family on this during my graduation in 2009, when I cooked a huge vegetable lasagna, with leftovers. So don't make if it's just the two of you - for health-related reasons!
The original recipe suggests raspberries, my absolute favourite food. But I've always gone into the shop intending to buy but flinch at the last minute at the cost. The recipe also calls for the meringue base to be rolled up into a roulade, which I've never managed - this is basically Nancy's meringue pie with a chocolate cream filling and strawberry topping. And good god it looks seriously impressive. 


Strawberry pavlova with chocolate cream
Serves about 6 to 8 people

  • 250g strawberries
  • 2 tbsp caster sugar
  • 150g plain chocolate
  • 400ml double cream
  • 5 egg whites
  • 275g caster sugar
  • Mint, optional garnish

Avoid doing this too much while cooking
Before you begin, 'mascerate' your strawberries. Cut off the green, and any other bits that would inhibit you from eating them whole, slice them all in half or quarters, then scatter over the 2 tbsp caster sugar. This will really bring out the flavour of the strawberries, and ensure that the fruit is gloriously sweet.
Meanwhile, get to making your meringue. Pre-heat your oven to 200C and line one of your biggest baking trays with greaseproof paper (suggest 33cm by 23cm swiss roll tin.) 
Whatever plastic mixing bowl you have knocking about in the back of your cupboard, rewash it with a non-skimpy amount of detergent to get any grease off and dry it with a clean tea towel. Carefully seperate your eggs - I like to have three bowls on  the counter. A mug to catch the white, one to catch the yolk, and then the bowl to tip the white into - meaning if you balls up one seperation, you don't lose contaminate most of your egg whites with yolk. 
Now, the whisking - get your electric whisk (and how I feel for you if you don't have one) and whisk on high until the peaks of the egg white are standing up stiff. Turn the setting on the whisk to low, and gradually add the caster sugar, stirring all the while until the mixture is nice and glossy. 
Fresh out the oven
Carefully spread the meringue mixture in the tin, and try to make as even as possible, then pop in the oven for 8 minutes. Don't forget! After this time lower the oven temperature to 160C for another 15 minutes, or until golden and firm on top. When it's done, take it out the oven, flip it over then peel off the backing paper, then put right-side-up again.
Chocolate cream time (you can do this while the meringue is cooking.) Whisk the cream now (avoid eating TOO many strawberries dipped in them), until it's a nice thick consistency. Meanwhile, melt your chocolate using a double boiler method, or if you're lazy like me, put it into a pan on a low heat and stir frantically until melted. Pour the now-melted chocolate off into a cold bowl and leave to cool down for ten minutes or so, so it doesn't curdle when you mix it. Fold the chocolate into cream (then sigh heavily at how gorgeous this looks), reserving a little chocolate for drizzling. 


Then it's just assembly: when the meringue is cooled off, use a big spoon to smear the lovely cream all over the meringue, then arrange the strawberries on top. Use a little teaspoon to flicky-flick little dribbles of dark chocolate all over the top for a nice effect, add a sprig of mint if you're using, then put it in the fridge until you're ready to serve it big indulgent slices to happy people. 
Credit where credit is due - Hugh Fearnley Whittingstall in The Guardian

Tuesday, 29 March 2011

Iced chocolate whoopie pies


I kind of fell out of love with baking a little while back - there were no more occasions to celebrate and while it's a gorgeously peaceful activity, it isn't exactly kind to a healthy diet so my cake-output went right down. I was feeling quite uninspired anyway.


Then one day at work this book came my way: "Let's make Whoopies!" Cringe, what a title. Cupcakes have sort of had their hay-day, if such a thing is possible and everyone is desperately trying to cash in on the next thing which will be in 'vogue'. Macaroons had a while but being virtually impossible to recreate at home, everyone is pushing whoopie pies - essentially discs of cake sandwiched together and topped with icing or something more elaborate.
For St. Patrick's Day in mid-March, I decided to give these a whirl. They went down rather popularly, although I know for sure if I'd recommend the book (any book with a quote from Simon Cowell on the front cover should probably be avoided). The tone is a little bit too self-congratulating for a first time recipe book ("My husband's office manager described them as little drops of heaven....they have been tweeted around the world!") That said, I'm going to have another look through - the book is full of interesting recipes, and a lot of low-gluten or egg-free recipes, as well as savories - Gruyère-and-caramelised-onion whoopie pies, anyone? I found the whole baking process on the stressful side, but that may very well just be the first stab at a whoopie pie for me. And they didn't turn out like the picture!!!  No, I'm not sulking. 
I've come across buttermilk in recipes before, but have never bothered to buy it - I have no use for more than I use to bake, really, so I just make a substitution. With my soda farls I add a teaspoon of lemon juice to the milk but this book suggests putting in milk and Greek yoghurt at a 50:50 ratio. Very curious and interesting suggestion - and maybe to blame why my mixture was so thick! 
As you can see, I messed up slightly and ended up with too-tall pies, but they were still delicious, marvellously dense, brownie-ish cakes that were a bit messy but glorious to eat and went down astonishingly well at the St Patrick's Day party I took them to, even if my Irish-themed icing looks kind of minging on them!


Makes 12 or so
  • 140g plain flour
  • 1 tsp vanilla essence
  • 40g cocoa 
  • 1 tsp bicarb of soda
  • 90ml buttermilk (or 45ml milk, 45ml greek yoghurt)
  • 80g unsalted butter (softened)
  • 140g light brown sugar
  • 1 free range egg (about 50g - beaten)
Preheat the oven to 200C and line a baking tray - you're going to need quite a few, or do them in batches. They need to be able to spread out and I ended up making them too tall and thick and ended up with whoopie spheres rather than pies.
Mix together the buttermilk (or substitute) and vanilla and set aside. Sieve the plain flour, cocoa and bicarb. In your largest mixing bowl, cream the softened butter and the sugar until smooth and light.  When it's all nice and pale-ish, start very, very slowly adding your egg (which I always mix in a mug - so much cleaner!). My mixture is semi-dark as I decided to use up some darker sugar I had lying around. 

My mixture began to seperate here slightly, but it all worked out okay.  Add and mix through the buttermilk and vanilla, then carefully fold in the cocoa, flour and bicarb. My mixture was extremely thick as well here. I'm not sure if that's normal. In retrospect, trying to measure out Greek yoghurt in mls is a little challenging as it's quite form-holding, so you can use a tbsp if you prefer.

Start dolloping onto your tray (or three trays or so), or piping, if you think you'd prefer to do that and own a piping bag (I don't.) and cook for 8 minutes or so. The image below they ALMOST went a bit wrong, so do space them out generously, especially if you want flatter cakes than the ones I produced. 


NOW MIGHT BE A GOOD TIME TO CLEAN  UP! Look at the bloody mess I made. 
Meanwhile, you can make the filling and the topping. The filling is a delicious vanilla cream cheese mixture, while the topping is just a basic icing sugar plus food colouring.


Filling
  • 50g unsalted butter (softened)
  • 150g cream cheese
  • 100g icing sugar (sifted)
  • 1 tsp vanilla essence
Topping
  • 140g icing sugar (sifted)
  • 2 tbsp water
  • Food colouring
For the filling, mix the butter and icing sugar until a nice smooth even paste, add the vanilla, then sift in the icing sugar and mix carefully with a wooden spoon so it doesn't puff out and settle EVERYWHERE. Be careful not to overmix as it'll get extremely runny and that's no fun.
With the topping, add water to the icing sugar drop by drop, stirring manically between drops - you may not need the entire 2tbsp as too-runny-icing is a problem that happens way too often with baking. Add as much food colouring as you like - a few drops normally do it.

Fresh out the oven!
Once the whoopie pies have come out the oven, it's not an exact science - simply smear a gluttonously thick spoonful of the icing between two cakes and squash together and drizzle over the icing, then if you want to add sprinkles, drop over while the icing is still wet.
Make sure you give them at least a few hours to set otherwise every time one gets eaten, 90% of the filling will end up on your hands! 

Tuesday, 7 December 2010

Awesome chocolate sponge birthday cake

This is my classic, fail-proof and always popular chocolate birthday cake, and it's survived being carried in the tube to Ealing, and on the overground to Barnsbury, and once all the way to Gloucester for my Aunt's 60th. I make this for nearly every single birthday - the beauty of the icing means that even if your sponge turns out terribly crumbly or dry, it will still be a hit. That said, this sponge is easy-peasy, slightly dense, and has been given the thumbs up by so many of my friends I've lost count.
I found this recipe in a now-unknown website place way back when I was first a student in London, to make for my flatmate on his birthday and I just kept going back to it. It's the creamy Philadelphia icing which does it, pushing it over into that amazing cheese-cakey flavour territory.
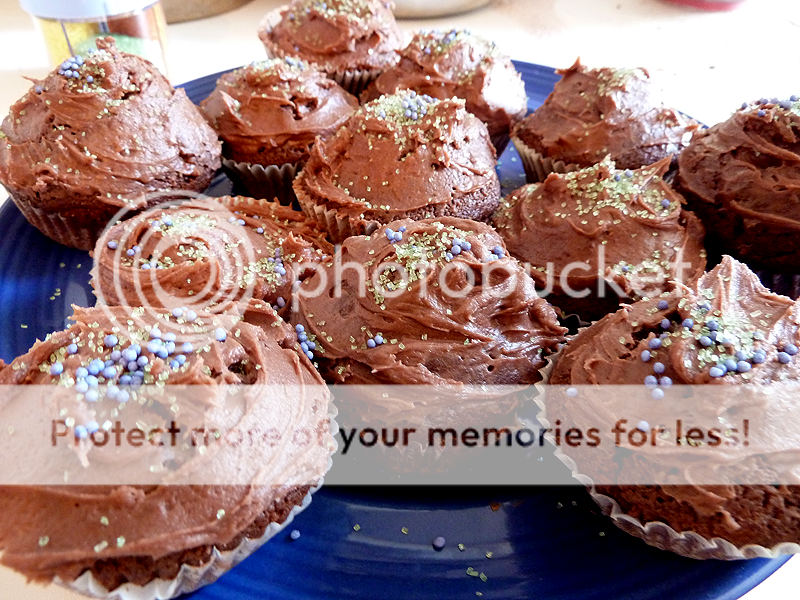
I've made this particular batch as cupcakes, as taking a birthday cake to a pub can be quite messy, and make the bar staff hate you. We enjoyed these in the Southampton Arms off Highgate Road, and it is a brilliant pub.

Makes 12 cupcakes. Maybe 13 but  who has a 13-case cupcake tray?

Awesome chocolate sponge birthday cake (in cupcake form)  
  • 175g unsalted butter, room temperature
  • 175g caster sugar
  • 30g cocoa
  • 150g self-raising flour
  • 3 eggs
  • 1 tsp vanilla extract 
Preheat the oven to 180C, and crack your three eggs into a smallish bowl. I like to use a jug or something, anything that my electric hand-held beaters can sit in. Add the vanilla to the eggs, and mix until frothy and pale.

Give the beaters a quick rinse, chop your butter up into a few small chunks and throw into a nice-sized mixing bowl, and combine the caster sugar and butter for a fair amount of time until mixed together. This usually takes a bit longer than I expect it to every time, but eventually it will come together in a nice consistent mixture. 

Slowly drizzle the eggs into the butter and sugar, a bit at a time, stirring all the while until it's all combined nicely. Now the messy part: measure out your 150g of flour and your 30g of cocoa (I normally make up 180g) and put it into a sieve. Hold it nice and high up above the bowl and gently tap it down - it does go a little bit everywhere, but the more air in it the better. Then fold in! Yummy chocolate batter.

Put them in the oven - I normally spread the batter thinly between two cake trays and make sure its greased and lined - and check frequently. Sometimes this cake only takes 10 minutes, so check crazy often! When a skewer is coming out clean, take the cakes out.
Meanwhile, you can start on your icing while the cakes are baking.
Rich cream-cheesey chocolate icing
  • 70g unsalted butter, room temperature (the remaining bit of your 250g pack from pack used in the cake)
  • 70g cream cheese 
  • 225g icing sugar
  • 1 tsp vanilla extract
  • 4 tsp cocoa, sifted
Mix together your unsalted butter with the cream cheese and the vanilla until blended, using the hand-held mixer again. This might end up smeared up the sides of your bowl, so just scrape it down. Then carefully sift in the icing sugar and cocoa. This can make a HUGE mess if you use the hand-held mixer, so maybe mix through half using a wooden spoon, then the remainder.
Then try not to eat it with your hands. I know it's a challenge for me.
Wait for your cake to cool (crucial step or your icing will melt and look tragic), and if you're doing cupcakes, smear liberally on top, otherwise coat the top of the lower sandwich half, place the second sandwich half on top, then cover the whole lot in icing. And if you're feeling fancy, sprinkles or whatever you feel like - it's a basic chocolate cake so you can spruce it up a little.
 I guarantee you will be very popular indeed!
Related Posts Plugin for WordPress, Blogger...